Follow

Saturday, November 12, 2022

Shoe Bags!!

Who doesn't love shoes?

I’ve been traveling quite a bit lately. When, I arrived home from my last trip, I unpacked and realized my past three trips I put my shoes in plastic store bags!  Yikes! When I first learned to sew, I had plenty handmade shoe bags that I used for my shoes. It was a super easy project for me to practice straight stitching and very necessary to my shoe collection! 😊 Being an avid garment sewer – I have TONS of shoes!

Well, my friends and family saw them and now I don’t have any! LOL! I have been without shoe bags now for over 5 years and I have an abundance of shoes!  I haven’t stopped traveling so, I am sharing how to make a shoe travel bag! Just in time to make some for myself and my next trip this November!

The key to this project is SIZE! It’s important to make a shoe bag that will fit your shoes. With the chunky heal style being on trend, this bag works great! 😊

The second key is fabric! There are so many fun cotton fabrics to choose from! Some have shoes and other fun motifs printed right on.  I’ll be using fabric from my stash. To make them fun and interesting, I’ll be using my Janome Horizon 15,000 to embroider some fun on one of my bags!

You will need:

½ Yard of medium weight cotton fabric (Quilter’s cotton is good). I don’t recommend interfacing on the cotton because it’s not needed.  (or)

½ Yard of Home decor fabric if you prefer to “up your shoe bag” game! Home decor fabric is durable as well as pretty! (Do not use Upholstery fabric-to thick and that backing is not good 😊) Also, a ½ yard of any fabric will yield you about 1 shoe bag!! (if you opt to make it smaller than my dimensions you could possibly manage to get 2.)

2 Yards of Ribbon - 1/4” – Drawstring – ¼” braid rope (for the home dec fabric users) You decide which to use based on your fabric choice! And away we go!

2 Drawstring Stoppers or 4 decorative beads (optional)

Marking Pencil/Pen or Tailor chalk

Straight Pins, Scissors or Rotary Cutter


The Steps:

 Cut 2 pieces of fabric 13.5” by 17.5” squares – (If you have an embroidery machine Now is the Time!) 

From the top Raw edge of the fabric, measure down 1.5” and draw a line across your fabric. (Wrong side) This will be the line you will fold to and start and end your stitching.

Step 1
Step 2


With right sides together, stitch sides in 1/2” Seam Allowances, start stitching at the line you marked.  Reinforce or backstitch at the beginning and then continue sewing and pivot at bottom corners to complete the square. Stop and back stitch at marked line. 

     Finish all seams and press seams to one side. You can finish your seam edges using a serger, pinking shears or a zig zag stitch on the seam allowances. (Whichever works for you is good!) I used a zigzag and pinking shears.

Step 3 & 4

With the bag wrong side out, Finish the raw edges at the top of the bag. Clip at the line and fold the top side seam allowances in ½” and press. Fold the (finished) edge 1 1/2” on each side of the bag, meeting the marked line. Press.

Step 5
Step 6


Stitch close to the edge that meets the line. Press. *Note* To add a ruffle to your bag, measure down 3/8” from the top fold of your bag and draw a line across the top on the front and back of the bag. Stitch on the line.  You should now see two rows of stitching. 


At the bottom corners, flatten the fabric as shown and stitch 1” from the point across the bag. This will “square” off the bottom of your shoe bag. Trim the excess off and finish with pinking shears, zigzag stitch, or serger. Turn your bag right sides out and Press seamlines! (Yes, Again 😊)


Thread the bag as illustrated. Raw edges of the string are threaded thru each side.  You can tie a knot or on the ends of the tie or add beads or string stoppers!

 Your bag is NOW complete!  Make as many as you like! Safe and Happy Travels!


Friday, July 1, 2022

Janome Project In July!


Project Time!

I was wondering what I could do for my Janome Project (as always) I am never ready. Luckily, I’m CLUTCH when necessary!  I got to thinking, it’s hot and summertime is here so, I decided to make some shorts!  Who doesn’t need shorts, right?  They are an easy and necessary sew! They are also good because you can use of those 1 to 1 ½ yard remnants cluttering up your sewing space.  I pulled a fabric that has been hogging up space for about 4 years. LOL


Now, let me get started.  It’s a cool fabric! It’s a bright striped twill I am using, and I have a matching stretch cotton to make a shirt!  Gotta love a catchy matchy matchy!


The pattern I am using for the shorts is McCalls 8221 I purchased last summer. These shorts don’t have cuffs and I love a good cuff in my shorts, so I am going to add them and let you in on the process.  Cuffs can be added to pants as well.  You’ll see how to add them while I make my garment!


You will need to make sure you have an extra four (4) inches of fabric added to the finished hemline you desire.  This fabric will form your cuff.  If you are using a pattern that does not have a “cuff”, the bottom of the pattern will taper slightly and the last inch (or whatever the hem allowance) and will angle out.  That is not what you want.

Not this!

You will need to square the bottom corners of your pattern (at the hem) to 45 degrees. *Note (If your pants are purchased “unfinished” at the hem, this will already be done). Sew your pattern as instructed.


Finish the bottom edge of your garment with an overcast stitch on your machine or serge. With your garment wrong side out, fold your hem to 2.5”.  Press the fold. If using a sewing machine, lengthen your stitch 3.0 and stitch all the way around using the fabric edge as your guide.  *Note (Feel free to use a blind hemmer or hand stitch your hem.)  Make sure you use a thread that matches your garment!

Finished Hem
     
Stitched Hem


Press your hem once again. Turn your garment right side out and at the hem, turn up the bottom 1.5”. *Note (This will leave an inch of fabric on the wrong side of the garment.) Use your seam gage for this to get an even cuff measurement all the way around. (Press as you measure and don’t forget to use your clapper!)
Stitch in the ditch

   
Clapper
Meausure Away!


Once you have the cuff in place at the side seams and inseam of the cuff, stitch in the ditch about 4 stitches back and forth. Clip the threads and press for the last time. 


You are Done!!!  Wear your garment with pride! You just saved yourself money with this alteration and/or learned a new skill! Nice Job!! 

Hope you enjoyed this and know if you don’t like a 1.5” cuff you can decrease the fold but the math is on you! LOL!!  Now I mush go and complete my top!!!

Talk Soon,
Carol

Monday, May 2, 2022

The Last Minute

A Garment Story

As garment sewist it seems like a thing we do. We plan but make our outfits the night before we need them. Garments for others, well that's different! lol!  We prep for months or weeks before - what pattern will I choose, will I draft a pattern, what fabric is in my stash, should I buy fabric etc.? Then life sets in and before you know it, it's time to go.

So, here is my story... 

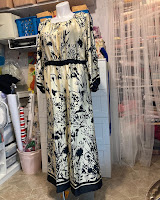
I purchased my fabric from FabricMart Fabrics in PA (went to visit last August) It's a soft rayon challis border print with a sheen! It was love at first sight! I had in mind to make Vogue 1851, but didn’t have enough fabric. My sew friend Carolyn decided to send me the fabric she purchased. (isn't she sweet). I received the fabric and started the garment out of sheer love for the fabric. The fabric was very fussy and required french seams. Since the fabric was so delicate, I used Mano (my Memory Craft 15,000 - this machine can do no wrong). I also used my Airthread 2000D to serged the bodice. It was after that I realized this fabric required extra care and french seams going forward. I was moving along with the garment and it seemed Mano's bobbin wasn't quite feeling well so, I had him serviced (He's home and fine now!) and continued on with Durt McGurt (She is the sauce!) my Janome S7. She was glad to finish the job and make things easy on me. I used my skill, fabric intuition and a regular pressor foot. (I'm a Janome Girl and I have 4 Janome Buddies! LOL!) 

My Janome Buddies!

Fast forward two weeks - I finished the outfit. Here are pics of the construction process and the finished garment.  I call her "The Carolyn" because Carolyn sent me the fabrics to complete this master piece.  I had to make quite a few alterations in addition to the french seams to finish her.

Boarder Print-Pants
Front View
 
Back View

French Seamed Slit Pocket
Bodice 
Sleeve View


French Seamed Pants
French Seam Close-up


Then came an invite to the event. Yes, Carolyn was finally finished, but I had no intention on wearing it. (Don't ask me why!)  I pondered, procrastinated, pulled out tons of patterns, purchased pattens, made another dress, made a top and messed up my sewing room until the night before the event - I finally decided to wear "The Carolyn".  Why did I put myself through weeks of all that stuff when I spent so much time on this outfit? I must KILL that last minute sew something itch It's AWFUL!


Anyhooooo - We had a great time and got plenty complements!!!
πŸ˜ƒ

Talk Soon,
Carol


Tuesday, April 26, 2022

Serger Time

My Serger is The Best!

Meet my serger. 

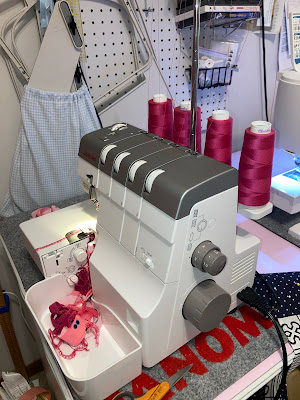
He doesn't have a name yet, but I tell you what, I LOOOOOVE it.  So, this month's post is dedicated to my buddy the Janome AirThread 2000D.  

When deciding what my September Janome project would be, I thought, my birthday dress! (It's this month!) I would sew my full outfit on my Horizon Memory Craft 15000 and use only "sewing" mode! It's an embroidery/sewing machine and I call him Mano.  


My past Janome projects always contained embroidery along with sewing. One project is "Pants for KC" linked here I never really highlighted my serger buddy, I just used him to complete my projects. In this post I'll feature him because he deserves the spotlight!

As garment sewists, we use our sergers to finish the insides of our garments or on knits, which include a bit of sewing machine work to complete a project. In my Facebook Sewing Group, I hosted a Teach-A-Long.  It's like a sew along but I try to teach the masses something new.  The project I chose was leggings.  Leggings you say?  Yes! Leggings. I took a poll and the masses said Yes!


Currently, leggings are worn by most, they are quick and easy to make and you can make them completely using your serger. For this teach-a-long I have Zoom recordings of classes that show you what you need to do to produce leggings that fit and appeal to you and your body. The classes are downloadable.   


One Zoom legging class is devoted to understanding your serger.  It involves threading your serger, understanding your stitches, adjusting your tension, tying off and I touch on differential feed and as we move forward I even cover fitting.  For this WHOLE Teach-A-Long my Janome AirThread 2000D is the πŸŒŸSTAR🌟 of the show and again I encourage everyone to use their serger on this project! I even had a few inquire about my JANOME buddy! LOL!!!!

Prep Work S8424
 
Class Demo's

My serger was acting like a champ during my demo's. I did mention that I Love him dearly in this post and in the video classes too.πŸ’•  This machine is super duper easy to thread and it takes the time out of prep work needed to start a project. THE STITCHES are always perfect and make me look like a Pro! πŸ˜‚ LOL!!  

Magic Happens!

Ready to go!!

Both of my project leggings are made completely on the AirThread 2000D. The white fabric and abstract printed fabric are cotton spandex. It's a two way stretch fabric that the machine handles like a dream. I used a 4 thread safety stitch for each project. The white leggings have a contrast panel of mesh and stretch lace which also sew nicely on this machine. I want to move forward with some new feet and discover what else this serger can do for me.  That is something major I can share with the group.

These got the fire started in the Group! S8212

Below I'm sharing a serger demo in which I show you how to remove serger threads without the dreaded "seam ripper". The stitching was provided by my AirThread 2000D. Although you see them being taken out, know that they went back in and my mistake corrected. LOL!!!


Talk Soon,
Carol